Friday, October 21, 2011

HOW TO: Use StumbleUpon For Blog Promotion

StumbleUpon


Just a click on the tab ‘Stumble’ and the whole world is in front of you, right from the funny jokes to the useful web applications. People are still unaware of the benefits and tips of using StumbleUpon and thus Twitter and Facebook are more popular social networking websites.
In this piece of writing you will get to knowsome interesting and 5 effective tips to get most of StumbleUpon.

1. Profile Picture

StumbleUpon is the best way to show people what are your interests and what you want to share with them, thus it is very important to add your own picture as the profile picture. Using any clip arts or cartoon as the profile picture makes it difficult for people to trust you.

2. Catchy Intro

A catchy intro makes people interested to follow you and your stumbles, thus it is very important to add an appealing intro to your profile. Remember not to make it clumsy in order to make different. Make it short, snappy and clear but try adding some interesting tag lines in the intro.

3. Follow and Make Others Follow You

To get more and more followers in StumbleUpon all you need is a quality content. People onStumbleUpon are very sincere bloggers and they look for quality content to follow. Make sure that you add some realistic and interesting information about you and your blogs on the ‘about’ page. This is the page which brings the most traffic for your website.

4. Use URL Shortener

People often be indecisive to follow the long URLs thus there are many URL shorteners available to shorten the URL so that people can connect to it. These URL shorteners are also available with the wordpress and blogger Plugins. For StumbleUpon, you just have to sign up with http://su.pr/.

5. Maintain The Followers

In the othr social networking websites you can follow unlimited people and get followed by them in return. But in StumbleUpon you can have only 500 followers, so make sure that you follow the right profiles. Try making a good ratio of followers and people you follow. It is always better to follow the active users to get maximum hits on your blog posts. Also make sure that the followers you have and the people you follow are relevant to your blogs.
Sincere follow to the above mentioned tips may help you get a good page rank for your blogs and websites, happy blogging.

How To Launch Chrome Web Apps Without Opening A New Tab Page

launch-chrome-apps

Google Chrome web apps – we already been covered this topic since its launch. I believe thatChrome web apps are one another cooloffering from giant company Google. I use quitea lot of Chrome web apps these days and truly speaking, these apps allow me to save lot of other stuff on my laptop because I don’t have toinstall them in my hard disk.
And I can use my Chrome web apps that I have installed anywhere in the world on anycomputer by syncing these apps with my gmail account. If you don’t know how to sync Chrome web apps across different computers, you can check our useful guide on using and customizing your Google Chrome web apps. If you use Chrome apps like the way I did, you must want to install some best free chrome apps that you can check here and here.
But there is one thing that I don’t like about Chrome web apps that when you install web apps in Google Chrome, you have to open a new tab page (Ctrl+T) in Chrome to launch any of the installed web apps and click on the relevant web app you want to use. I was thinking one day that what if you want to open the web app directly without opening a new tab in Chrome?
My research leads to me a simple solution that will help you to open any Chrome web apps without opening the new tab. Let’s see how to launch Chrome web apps without opening a new tab (Ctrl+T).
There is a Google Chrome extension called App Launcher that comes into play. It adds a browser action icon – when you click on it you get a list of your installed apps. From there, you can launch any app by either clicking on it in the list, or using arrow keys to select it and then pressing enter. It also search for the installed apps as you type in the search box.
If you any other way to open installed web apps without opening new tab page, do tell us in the comments section below.

How To Connect Printer With Google Cloud Print And Start Printing From Your Mobile

cloudprint

Google company is on roll these days with its latest launches starting from Android Honeycomb with some awesome features that iPhone users will envy, Chrome OS roll-out, Chrome Web Store having cool web apps and latest addition is Google cloud print (beta)
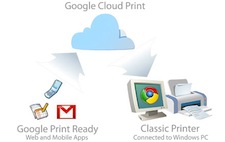
Google cloud print is a new service that allows to print documents from your smart phones that supports HTML5 or OS above Android 2.1. It also allows printing of documents from yourGmail account without need of any software. This service makes printing more intuitive and accesible by allowing you to print documents from your set-up printers from any computer or smart phone.
As for now, Google cloud print is supported for Windows OS only running Windows XP, Vista or 7. But, it may soon available for Mac and Linux OS according to their official site. To startprinting, you need to connect your printer to Google cloud print service. After connecting your printer with Google cloud service, you will be able to print from any computer or smart phone, regardless of where you are. Let’s see step to step guide on illustrating how to connect and use your printer with Google Cloud print service?
1. Download and install latest build of Google Chrome browser from here, i.e., Google Chrome 9.0.597.1 or greater.
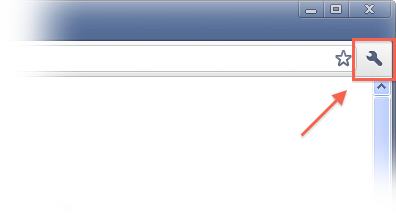
2. Click the wrench icon in Google Chrome browser (upper right hand side of the page) on the Window PC that is connected to your printer. Choose “options” button from the drop down menu.
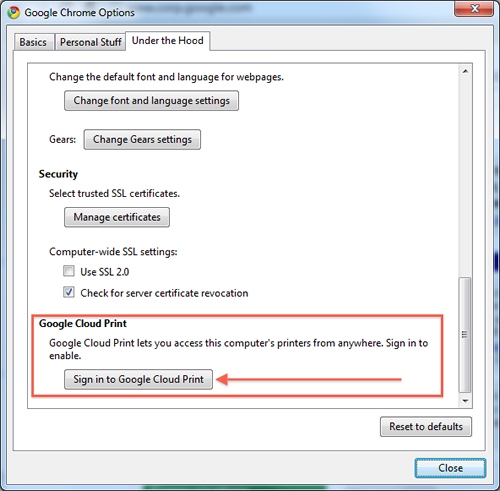
3. Now, click “Under the Hood” tab. Scroll to the bottom of the settings pop-up and click “Sign in to Google Cloud Print”.
4. A dialog appears where you have to enter your Google account details.
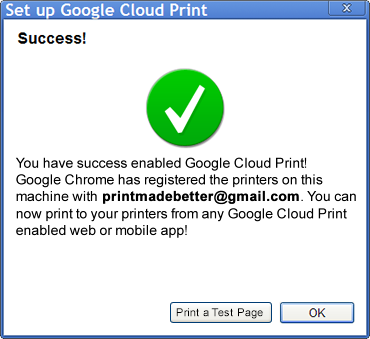
You will see a pop-up window after signing into your Google account.
That’s it, your printer is connected with Google cloud print and now you can print any document from any computer or smart phone in any part of the world.
After connecting your printer, let’s see how to print documents from your mobile using Google cloud print service?
This is pretty easy – just type gmail.com in your iPhone or Android browser and choose “Print” option from the dropdown menu in the top right hand corner. You can also click on “Print” link appears next to email attachments such as .pdf or .doc.
It might happen that you can’t see the above option in Chrome or mobile because Google is rolling out this service in U.S. and will available in every part of the world in next few days.

How To Find Out Who Unfriended You On Facebook

screen-capture-2

FaceBook is the most exciting, popular and lovable social networking website on the Internet. Facebook users love to update about their social and personal life with their friends, family and followers. The latest addiction forFacebook users are adding more and morefriends, its fun having friends from different origins and country, but can be disheartening when someone removes you from their friend list.
Personally, I love having connection with people from different countries because it helps me to know about their values, cultures and other interesting facts. Sometimes, the connection got lost when they unfriended you or deactivate the account.
Well, unfriended someone is always a personal decision but there is always a curiosity to get the name of that person. There are many tools floating on the interent that helps you to know who unfriended you on Facebook but using them is typical and time consuming process.
However, Google has introduced a new Chrome Extension called Unfriend Finder that helps you to find who removed you on Facebook from their friend list. Basically, Unfriend Finder is a simple script that provides all its users to know which one of their friend removed them in notifications after installing the Chrome extension. One the script added, you will be able to discover which of your contacts are your old “friends” virtual.
Let’s see how to know who removed you from their Facebook friend list with the help of Unfriend Finder Chrome extension.
1) Install the Unfriend Finder for Facebook. It will ask you to collect all your data on the website, you have to click on “access” button to aprove.
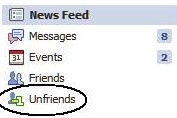
2) Now login into Facebook account and permit an action to set up the extension for the first time. After setting up, a link will appears in the menubar.
Facebook-unfriend finder-menubarNote: You usually start with zero Unfriend, this number may increase over time. When someone removes you or deactivates its account, you’ll be able to know easily with notifications.
3) . You can also change the settings for notifications as per you need and you will notice a “Unfriends” option just after the whole process.As per your need you can also change the settingsfor notifications.
You will get notified instantly if any of your friend “unfriend” you on Facebook.
Facebook unfriend finder
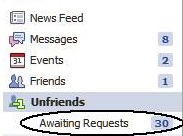
Separately you are also allowed to see “Awaiting request”.
It’s the easiest tool to know who unfriended you on Facebook but personally I don’t suggest anyone to know those persons who don’t want you in their life. If you feel depressed after seeing the friends who unfriended you, go n uninstall the extension right away.